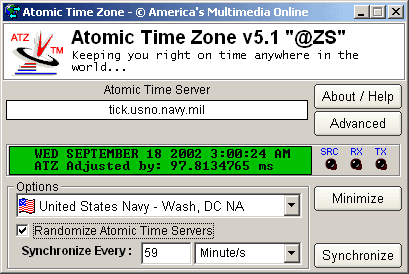
Overview of Main Screen
The Main screen shows all of your Atomic Clock Activity. Each Atomic Clock connection is displayed using the
SRC, RX, and TX Green LEDs'. From this screen you can access all other ATZ Screens including the About / Help screen, and the Advanced Options screen.

Atomic Time Server - Just below this text is the active Atomic Clock Server. When using the below Options pull down menu in which the country flag is to the left, this Atomic Clock Server will change to the appropriate server selected by it's friendly name.
Green LCD Like Readout - The Green LCD Like display contains the active atomic time. This display changes each second. During an Atomic Clock communication, this display will show which time protocol is active, and any adjustment made by the ATZ using the Atomic Clock. To the right of this display are the activity LEDs.
SRC labeled LED - The SRC LED flashes when attempting to communicate with an Atomic Clock.
RX Labeled LED - The RX LED is solid when actual data is being received from an Atomic Clock, and is black when no data is received.
TX Labeled LED - The TX LED is solid when actual data is being transmitted to an Atomic Clock, and is black when no data is transmitted.
Main Options
Friendly Server Names / Locations - This pull down menu controls which Atomic Time Server is used. When your Region is set and the "Randomize" checkbox is checked, ATZ will change this randomly and automatically according to your region.
Randomize Atomic Time Servers - This checkbox controls random server selection according to your region. When enabled, ATZ will automatically select your Atomic Time Zone Server each time it synchronizes. This is the default setting.
Synchronize Every: - The first option is a number. As displayed it's 5. The second option is whether 5 is applied to second/s, minute/s, hour/s, or day/s. Here you see how easy you can change ATZ Synchronization from 5 Minutes to 5 Hours, or from 5 Minutes, to 50 Minutes. This option provides the most control over Synchronization frequency possible.
About / Help Button - This button provides instant access to the ATZ About Screen. From here you can enter your registration code, or access your registration info. This screen also provides access to this help system from the click of a button and secure online purchasing from the click of a button. Click Here to access the About Screen Help
Advanced Button - This button provides instant access to the ATZ Advanced Setup and Options Screen. From here you can control your startup options, select your region, time protocol, and ATZ Windows Clock Skin settings. Click Here to access the Advanced Screen Help
Minimize Button - Use this button as a conveinent way to place ATZ into your Windows TaskTray quickly.
Synchronize Button - This button initiates an Atomic clock Synchronization attempt using the selected protocol, time server, and region.
|


