Overview of Main Screen
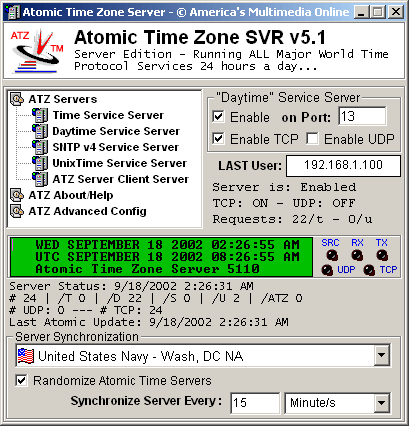
The Main screen shows all of your Atomic Time Zone Server Activity and allows you easy control of enabling and disabling each server. Each server connection is displayed using the
SRC, RX, TX, TCP and UDP Green LEDs'. From this screen you can access all other ATZ Server Screens including the About / Help screen, and the Advanced Options screen.

Enable Checkboxes - Each "Enable on Port" checkbox will control each time servers availability for use. Each Port checkbox specifies what communication port the time server will operate on. In this screenshot you will see the default value of the selected time servers communciation port. To select a time server to configure, select it from the list on the left.
To change a servers default communication port, first disable the server by unchecking the "Enable on Port" checkbox - next simply enter the new port number value, and press the enter key.
The Enable TCP checkbox for each server enables Transmission Control Protocol for the particular server and port. Unchecking this box disables TCP on the particular server port.
The Enable UCP checkbox for each server enables User Datagram Protocol for the particular server and port. Unchecking this box disables UDP on the particular server port.
Please note: On Windows 2000 Server versions, "Simple TCP/IP Services contains the 'DayTime' Service". In order to use the ATZ NIST Compliant Daytime Service, disable the Windows 2000 Server "Simple TCP/IP Services" from the Administrator Services Applet.
Green LCD Like Readout - The Green LCD Like display contains the active atomic time. This display updates once a second and shows the current server time (local) and UTC time. To the right of this display are the activity LEDs.
SRC labeled LED - The SRC LED flashes when attempting to communicate with an Atomic Clock.
RX Labeled LED - The RX LED is solid when actual data is being received from a time request, and is black when no data is received.
TX Labeled LED - The TX LED is solid when actual data is being transmitted to a time request, and is black when no data is transmitted.
UDP Labeled LED - The UDP LED is solid when the UDP protocol is currently in use.
TCP Labeled LED - The TCP LED is solid when the TCP protocol is currently in use.
Main Options
Friendly Server Names / Locations - This pull down menu controls which Atomic Time Server is used. When your Region is set and the "Randomize" checkbox is checked, ATZ will change this randomly and automatically according to your region.
Randomize Atomic Time Servers - This checkbox controls random server selection according to your region. When enabled, ATZ will automatically select your Atomic Time Zone Server each time it synchronizes. This is the default setting.
Synchronize Every: - The first option is a number. In Example, the number 5. The second option is whether 5 is applied to second/s, minute/s, hour/s, or day/s. Here you see how easy you can change ATZ Synchronization from 5 Minutes to 5 Hours, or from 5 Minutes, to 50 Minutes. This option provides the most control over Synchronization frequency possible.
About / Help Button - This button provides instant access to the ATZ Server About Screen. From here you can enter your registration code, or access your registration info. This screen also provides access to this help system from the click of a button and secure online purchasing from the click of a button. Click Here to access the About Screen Help
Advanced Button - This button provides instant access to the ATZ Server Advanced Setup and Options Screen. From here you can control your startup options, select your region, time protocol, and enable logging functionality. Click Here to access the Advanced Screen Help
How to install and configure an ATZ Server Client
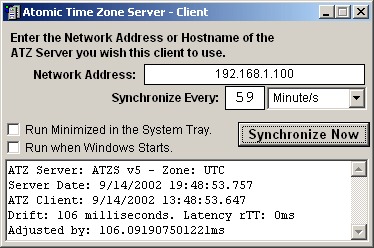
From the Main ATZ Server computer, locate the ATZS_Client.exe in the main program folder. This installation will install the ATZ Server Client on any client machine. Simply copy this file to the client machine and install, or remotely install the file to the client machine from the server. Once the ATZ Server Client is installed on the Client Computer, it needs to be configured to use the ATZ Server by its hostname / network address. Companies who have purchased 50 or more ATZ Server Client licenses, please contact us for support on automating the Client configuration process.

|


